End-to-end testing is no longer just a „nice-to-have” in modern Angular development – it’s a key part of building stable, reliable apps. As projects grow and release cycles speed up, we need more than just unit tests to catch issues. We need to see the app the way users do.
Modern tools like Playwright make that process faster, more intuitive and better suited to the way we build apps today. For Angular developers, it’s a natural fit that helps you deliver features with more confidence and less guesswork.
Introduction
Playwright is a modern end-to-end testing framework developed by Microsoft that enables reliable, fast and cross-browser testing for web applications. It supports multiple browsers out of the box, allows testing across different devices and provides powerful features like auto-waiting, network control and parallel test execution – all designed to help developers catch issues early and ensure a smooth user experience.
Why choose Playwright?
Playwright brings together speed, reliability and flexibility in a way that just works for modern web testing. Whether you’re writing quick smoke tests or full end-to-end flows, it gives you a consistent API and tooling that fits real-world needs. Here’s what makes it stand out:
- cross-browser compatibility: you can execute tests on Chromium, WebKit and Firefox,
- cross-platform execution: runs tests on Windows, macOS and Linux – locally or in CI, with headless or headed mode,
- language flexibility: you can use Playwright with TypeScript, JavaScript, Python, .NET, or Java,
- mobile web testing: emulates real-world devices using Chrome for Android and Mobile Safari,
- resilient by design: features like auto-waiting and web-first assertions minimize flaky tests and remove the need for manual timeouts,
- isolated test environments: lightweight browser contexts provide full isolation without performance overhead,
- support for advanced use cases: handling of multiple tabs, origins, users and even Shadow DOM within a single test,
- integrated tooling: includes code generation, an interactive inspector and a trace viewer for debugging and analysis,
- optimized performance: fast test startup and parallel execution,
- persistent authentication: reusable login sessions across tests without sacrificing test independence.
Playwright isn’t just powerful – it’s thoughtfully designed for developers. It takes advantage of what modern browsers offer and wraps it in a workflow that feels natural to work with.
Differences from Cypress
Both Playwright and Cypress are solid choices for end-to-end testing and these days, they share a lot of similar features. But they take different approaches under the hood – and that can affect how they fit into your workflow.
Cypress runs directly in the browser, which gives you a very tight feedback loop and a smooth developer experience. But because it runs inside the browser, it has some limitations – like not being able to handle multi-tab scenarios or test things outside the browser’s sandbox.
Playwright, on the other hand, runs outside the browser, giving you full control over the browser’s internals. That means you can handle multiple tabs, cross-origin scenarios and more. The tradeoff? Some setups – like persistent authentication or complex session management – might require a bit more work up front.
At the end of the day, both tools are capable and mature. The right choice depends on what your project needs, how your team likes to work and how much flexibility you want in the long run.
Setting the stage
Example application
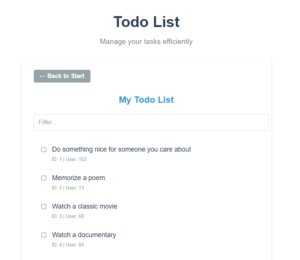
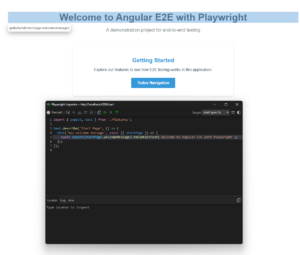
To keep things simple and focused, we’ll use a minimal Angular app for our demo. It has just two main routes: a Start page, which acts as the entry point and a Todos page with a basic to-do list component.
It’s a lightweight setup, but it’s enough to cover a range of real-world E2E testing scenarios without adding too much noise.
Start page:

Todos page:
Installing Playwright
To integrate Playwright into your project, execute the following command in your terminal:
npm init playwright@latestThe command handles the necessary configuration and prompts for several setup preferences:
- language preference: TypeScript (default) or JavaScript,
- test directory: defaults to tests, or e2e if a tests directory already exists,
- CI integration: option to automatically generate a GitHub Actions workflow,
- browser installation: determines whether Playwright’s browser binaries should be installed (default: true).
Integration with Nx
If your workspace utilizes Nx, you can add Playwright to your existing project by running:
nx g @nx/playwright:configuration --project=your-app-nameThis command registers the necessary plugin and configures the project accordingly, ensuring proper compatibility within the Nx ecosystem.
Alternative: Visual Studio Code Extension
Playwright can also be installed and managed via its dedicated Visual Studio Code extension, which offers additional tooling for authoring, running and debugging tests. This method will be briefly outlined in a later section to highlight its capabilities and usage.
Initial setup for Angular projects
Playwright gives you a flexible config system that makes it easy to fine-tune how your tests run. Most of the setup lives in a playwright.config.ts (or .js) file at the root of your project.
Here are a few key options you’ll commonly work with:
- testDir: specifies the directory, relative to the configuration file, where Playwright will look for test files,
- workers: controls the maximum number of concurrent worker processes that Playwright will spawn to run tests in parallel. You can specify the number of workers as an absolute value (e.g., 4), or as a percentage of the available CPU cores (e.g., ’75%’),
- projects: allows you to define different environments (browsers, devices, etc.) in which the tests will be executed. This can include configurations for different major browsers like Chromium, Firefox and WebKit, along with specialized settings such as device emulation or context initialization.
Projects can also be used to pass dependencies like fixtures or storage state files. For instance, you can pass an authentication fixture or storage state file to maintain a logged-in session across multiple tests, - webServer: configures a local development server to be launched before running the tests. Example:
webServer: {
    command: 'npm run start:dev',
    url: 'http://localhost:4200',
  }
These options are super customizable and you can mix and match them to support things like cross-browser testing, parallel runs, or different CI environments.
For this article, we’ll stick with the default Playwright configuration to keep things simple.
Structuring tests effectively with Playwright
A well-structured test suite improves reliability, readability and maintainability. This section explores best practices for organizing tests using Playwright, ensuring your automation remains efficient and scalable.
Organizing test files and directories
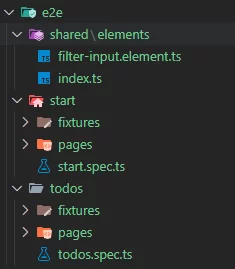
For our example app, we’ve structured the end-to-end tests to keep things modular, maintainable and aligned with the app’s page structure. Here’s how we organize the test directories:
- shared/: contains cross-cutting elements and components reused across multiple test suites (e.g., buttons, modals, search inputs),
- <page>/: encapsulates all test-related logic for a specific page or feature. This includes page objects, fixtures, elements and test specifications.
 Each directory typically includes:
 - elements/: defines isolated, reusable UI elements,
- pages/: Implements page objects using the Page Object Model pattern. Each class provides an interface for interacting with the corresponding page,
- fixtures/: contains setup logic specific to the page, such as state initialization and navigation. Used to prepare consistent preconditions for tests,
- <page>.spec.ts: the test specification file containing actual test cases for the page.
This structure helps keep tests organized and easy to scale, making it simpler to maintain as your app grows.
Writing Your First E2E Test
One of the powerful features of Playwright is its ability to handle synchronization automatically. Playwright automatically waits for a wide range of actionability checks to pass before performing each action. This built-in synchronization ensures that you can focus on writing your tests without worrying about timing issues. For example, when you interact with an element, Playwright automatically checks that the element is visible, enabled and ready for the action you’re trying to perform.
Another key feature is Playwright’s handling of race conditions. Playwright assertions are designed to describe expected conditions that should eventually be met, rather than requiring an immediate state. This allows the framework to wait for conditions to be satisfied without prematurely failing, ensuring tests are both reliable and resilient to fluctuating load times.
Moreover, Playwright executes tests in complete isolation, simulating a fresh browser environment for each test. This means that even when multiple tests are running within a single browser instance, each test operates as if it’s in a brand-new browser profile. This isolated execution ensures there are no shared states between tests, leading to more consistent and predictable results across different test runs.
test('Test 1', async ({ page }) => {
  // page is isolated
});

test('Test 2', async ({ page }) => {
  // page is completely isolated from the page in Test 1
});
Basic test
For our initial end-to-end test, we want to ensure the welcome message on the start page displays the correct text: „Welcome to Angular E2E with Playwright”.
To make it easier to identify the target element, we’ll add a data-testid attribute to it. Here’s the code for the element:
<header class="header">
    <h1 data-testid="start-page-welcome-message" class="title">Welcome to Angular E2E with Playwright</h1>
    <p class="subtitle">A demonstration project for end-to-end testing</p>
  </header>
Now, we can use Playwright’s getByTestId() function – which is part of the built-in Page fixture – to locate and interact with the element during the test. Here’s how the test case looks:
import { expect, test } from './fixtures';

test.describe('Start Page', () => {
  test('has welcome message', async ({ page }) => {
    await page.goto('/start');

    await expect(page.getByTestId('start-page-welcome-message'))
    .toContainText('Welcome to Angular E2E with Playwright');
  });
});
While this test works well, there are some opportunities to clean things up and make the code more maintainable. For example, the repeated await page.goto(’/start’); can be avoided (currently we have to repeat that in every test case) and relying on the data-testid selector directly can make the tests harder to read and maintain.
To reduce redundancy and improve clarity, we can refactor the test using the Page Object Model pattern. POM allows us to abstract away the implementation details like navigation and element locators, so that the test is more focused on the behavior we’re actually testing.
Let’s now refactor the test to leverage the Page Object Model.
Using Page Object Model
As mentioned earlier, Page Object Models help structure and optimize test maintenance. By centralizing element selectors and interactions, POM reduces repetition, increases reuse and keeps your tests cleaner. It also makes refactoring easier, since UI changes are isolated to the page objects.
Let’s now migrate our start page test to use a Page Object Model pattern.
Step 1: Create the Page class
We start by creating a dedicated page class for the start page. This class will handle interactions with the page, including element selectors and navigation. We’ll put it in a new file called start.page.ts inside the pages directory.
import type { Locator, Page } from '@playwright/test';

export class StartPage {
  readonly welcomeMessage: Locator = this.page.getByTestId('start-page-welcome-message');

  constructor(private readonly page: Page) {}

  async goto() {
    await this.page.goto('/start');
  }
}
In this class, we define a locator for the welcome message and a goto() method to navigate to the start page. This encapsulates page logic in one place.
Step 2: Refactor the test
Now, instead of manually navigating and querying the DOM, we simply use the startPage, which provides direct access to the page’s elements and methods.
import { expect, test } from '@playwright/test';
import { StartPage } from './pages';

test.describe('Start Page', () => {
  test('has welcome message', async ({ page }) => {
    // Create an instance of the StartPage class and navigate to the page
    const startPage = new StartPage(page);
    await startPage.goto();

    await expect(startPage.welcomeMessage)
    .toContainText('Welcome to Angular E2E with Playwright');
  });
});
This is an improvement, but our test setup still has a bit of overhead – we’re manually creating a class instance and navigating to the page each time. We can streamline this by introducing a custom fixture to handle that setup for us.
Step 3: Use custom fixture
Playwright is designed around test fixtures, which help set up just what each test needs – and nothing extra. Fixtures are isolated, so every test starts fresh with a clean environment. You’ve already seen this in action – when you use ({ page }) in a test, Playwright is using its built-in page fixture to give your test access to a browser page.
To make our test setup cleaner and more reusable, we can extend the base fixture to include our startPage object. This way, the fixture takes care of navigating to the start page before each test, so we can focus on writing the actual test logic and assertions, without repeating the same setup steps.
Here’s how we define our custom fixture in start.fixture.ts (inside the fixtures directory):
import { test as base } from '@playwright/test';

import { StartPage } from '../pages';

export const test = base.extend<{ startPage: StartPage }>({
  startPage: async ({ page }, use) => {
    // Setup of the fixture
    const startPage: StartPage = new StartPage(page);
    await startPage.goto();

    // Use the fixture value in the test
    await use(startPage);

    // Potential teardown of the fixture
    // e.g. await startPage.close();
  },
});

export { expect } from '@playwright/test';
With this in place, each test automatically gets a ready-to-use startPage object that’s already navigated to the correct URL.
Now we can simplify our test like this:
import { expect, test } from './fixtures';

test.describe('Start Page', () => {
  test('has welcome message', async ({ startPage }) => {
    await expect(startPage.welcomeMessage)
    .toContainText('Welcome to Angular E2E with Playwright');
  });
});
Thanks to the custom fixture, the test now focuses solely on what really matters – the expected behavior. Setup is handled behind the scenes, making tests easier to read, write and maintain.
Benefits of using Page Object Model
Refactoring with the Page Object Model brings several advantages that can make your test suite more efficient, easier to maintain and scalable. Here’s a breakdown:
- reduces code repetition: centralizes navigation and selectors, cutting down on redundant code,
- improves readability: focuses tests on behavior, making them cleaner and easier to understand,
- boosts maintainability: when selectors or UI elements change, you only need to update them in the Page Object, not across every test,
- scales with ease: keeps the test suite organized and flexible as your application grows.
Reusable test elements
As we’ve already seen with the Page Object Model for pages, we can apply the same pattern to reusable parts of the application, such as buttons, input fields, or other shared components. This approach ensures that our tests remain clean and easy to maintain.
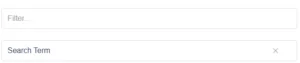
In this case, we’ll create a reusable test element for the FilterInputComponent. This element will allow us to interact with the filter input field: entering values and resetting the input when needed.
Step 1: Add data-testid attributes
To get started, we need to make sure the component, input field and reset button are easily identifiable in our tests. We do this by adding data-testid attributes to each element in the FilterInputComponent.
Here’s how the component looks after adding the data-testid attributes:
@Component({
  selector: 'app-filter-input',
  templateUrl: './filter-input.component.html',
  styleUrl: './filter-input.component.scss',
  host: {
    'data-testid': 'filter-input-component',
  },
})
export class FilterInputComponent {
  // …
}
And the template with data-testid attributes added to the input and reset button:
<div class="filter-container">
  <input
    type="text"
    placeholder="Filter..."
    class="filter-input"
    data-testid="filter-input"
    [(ngModel)]="searchTerm"
    (ngModelChange)="emitSearchTerm()"
  />

  @if (filterText()) {
  <button class="filter-reset" data-testid="filter-input-reset" (click)="resetFilter()">✕</button>
  }
</div>
Step 2: Create the reusable Element
Now that we have the necessary data-testid attributes in place, let’s create a FilterInputElement class that will allow us to interact with the input field and the reset button.
We’ll add this class to a new file called filter-input.element.ts inside the shared/elements directory. Here’s how the class looks:
import type { Locator, Page } from '@playwright/test';

export class FilterInputElement {
  private readonly container: Locator = this.parent.getByTestId('filter-input-component');

  readonly input: Locator = this.container.getByTestId('filter-input');
  readonly resetButton: Locator = this.container.getByTestId('filter-input-reset');

  constructor(private readonly parent: Locator | Page) {}

  async fillInput(text: string): Promise<void> {
    await this.input.fill(text);
  }

  async clearInput(): Promise<void> {
    await this.resetButton.click();
  }
}
The FilterInputElement class provides methods to fill in the input field with a given text (fillInput(text)) and clear the input by clicking the reset button (clearInput()). This makes interacting with the filter input in our tests much easier and cleaner.
Step 3: Integrate the Element into the Page Object
Next, we need to create a custom page for our todos page and integrate the FilterInputElement into it. By doing this, we can access the filter input functionality directly within the context of our Todos page.
Here’s what the TodosPage class looks like:
export class TodosPage {
  // Add the filter input element to the page class
  readonly filterInput: FilterInputElement = new FilterInputElement(this.page);

  constructor(private readonly page: Page) {}

  async goto() {
    await this.page.goto('/todos');
  }
}
With this setup, we now have access to the filterInput element from the TodosPage class.
Step 4: Create the Fixture
Fixture is created in the same way as previously:
export const test = base.extend<{ todosPage: TodosPage }>({
  todosPage: async ({ page }, use) => {
    // Setup of the fixture
    const todosPage: TodosPage = new TodosPage(page);
    await todosPage.goto();

    // Use the fixture value in the test
    await use(todosPage);
  },
});

export { expect } from '@playwright/test';
Step 5: Write the test
Now, we can write a simple test that verifies the functionality of the filter input on the TodosPage. We’ll use the filterInput element from the todosPage fixture and check that we can correctly type a value into the input field.
Here’s the test:
import { expect, test } from './fixtures';

test.describe('Todos Page', () => {
  test('input should have correct value', async ({ todosPage }) => {
    todosPage.filterInput.fillInput('Test value');

    await expect(todosPage.filterInput.input).toHaveValue('Test value');
  });
});
In this test, we use the fillInput method of the FilterInputElement to type „Test value” into the input field and then assert that the field’s value is correctly set.
Authentication
Playwright enables tests to run in isolated browser contexts while supporting the reuse of previously authenticated sessions. This is achieved by loading a persisted authentication state from the file system. Typically, this involves creating a dedicated setup project – essentially a preliminary test script – that performs the authentication workflow and saves the resulting session state to a specified storage file. This setup project is then referenced as a dependency in the Playwright configuration, ensuring that downstream tests can bootstrap from an authenticated context.
The Official Playwright Documentation provides comprehensive guidance on implementing this pattern across various use cases.
Running and debugging Tests
Tests can be executed using the following command:
npx playwright test If your project is managed with Nx, you can run end-to-end tests using:
nx e2e <PROJECT-NAME> By default, tests are executed across all browsers specified in the Playwright configuration file. These tests run in headless mode by default, meaning test output is displayed exclusively in the terminal.
For a more interactive experience, you can switch to UI Mode, which allows for step-by-step debugging of test execution. In this mode, you get helpful tools like the locator picker for easier element targeting and watch mode, which automatically reruns tests when file changes are detected.
UI Mode can be enabled by appending the –ui flag to the test command:
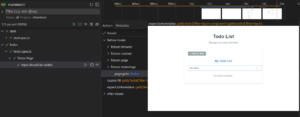
npx playwright test --uiThis mode provides a visual interface for inspecting test execution in real time.
In the attached screenshot, you can see the test execution timeline for the Todos page, which illustrates the sequence and duration of each test step. This visualization is great for debugging and performance analysis.
Using the Playwright Inspector
Running tests with the –debug flag opens the Playwright Inspector. This also launches the browser in headed mode and disables the test timeout by setting it to 0. When you execute your entire test suite with the –debug flag, each test runs sequentially, opening a new browser instance and Inspector window for every individual test.
The Inspector lets you play, pause and step through test execution. You can see the current action highlighted both in your code and in the browser, which makes it much easier to follow what’s happening. If you want to jump straight into a specific part of a test, you can add page.pause() to pause execution at that point.
You can also use the built-in locator picker to hover over elements in the browser. As you do, it shows the locator you can use in your test code. Clicking an element adds that locator to the Inspector’s input field, making it simple to copy and paste directly into your tests.

Tests parallelization
By default, Playwright optimizes test execution by running test files in parallel using multiple worker processes. Within each test file, however, tests are executed sequentially within the same worker.
If you’d like to run tests within a single file in parallel, you can enable this behavior globally by setting fullyParallel: true in your Playwright configuration. Alternatively, you can enable it on a per-project basis within your config. For more granular control, you can enable parallel mode for specific test suites using: test.describe.configure({ mode: 'parallel’ });.
To disable parallel execution entirely, set workers: 1 in your configuration file or pass –workers=1 via the command line. When parallelism is disabled, test files will be executed sequentially in alphabetical order.
CI/CD
In general, e2e tests written with Playwright can be run on any CI provider. See the Continuous Integration or Setting up CI pages in the official documentation for detailed instructions.
Bonus: VS Code extension
If you’re using Playwright regularly, the Playwright Test for VSCode extension is a solid way to streamline your workflow. It tightly integrates Playwright into VS Code, giving you a bunch of useful tools right where you’re already working.
Getting started is simple. To install Playwright with this extension open the command palette and choose “Install Playwright”. The extension will guide you through the setup – you can select which browsers you want to use and even choose to add a ready-made GitHub Actions workflow for CI.

The additional prompts will let you to pick the wanted browsers or even add GitHub Actions workflow.
Once installed, the extension gives you a Test Explorer panel. From there, you can run individual tests or entire test suites, toggle watch mode to rerun tests automatically, or jump into debug mode to troubleshoot directly in VS Code.
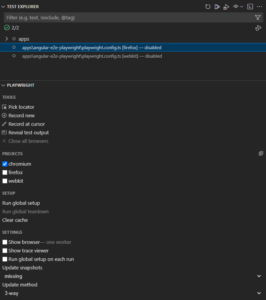
You also get tools like the Pick Locator utility, which helps you grab selectors straight from the browser and the ability to record new tests. Want to see what the browser is doing? Just toggle the “Show browser” option to switch into headed mode.
For me, using the Playwright extension in VS Code has become the go-to setup. It’s intuitive, saves time and keeps everything in one place. If you’re working with Playwright daily, I definitely recommend giving this extension a try – it just makes the workflow smoother.
Wrapping up
Playwright makes end-to-end testing for Angular apps not just powerful, but surprisingly developer-friendly. In this article, we walked through the setup, wrote some example tests and explored key features that make Playwright stand out for modern web apps.
What we covered is just scratching the surface. Playwright also supports advanced features like visual comparisons with screenshots, mocking network requests, testing across different viewports and devices and much more. Whether you’re testing responsive layouts or complex user flows, there’s probably a built-in tool for it.
If you’re looking for a modern, fast and flexible approach to E2E testing – especially for Angular – Playwright is absolutely worth considering.